Programming in C#, Java, and god knows what not

We're Off to See the Market

Illustration

In order to put application on Android Market one of most important steps is signing it. There is pretty comprehensive guide available for that in developer documentation. I followed instructions wondering why everything needs to be done in command-line only to discover at the very end that those steps are not needed.

All you need is proper setup of your development environment. Once you have that, creating Market-ready application is just matter of right-clicking on project and selecting “Export Android Application”. From there wizard will guide you through key creation, compilation and all other necessary steps.

Retrieving Application Icon in WPF

As I started doing more and more work in WPF, I had to port my “About” dialog. In attempt to keep everything clean of Windows Forms that also meant that I need to find another way of loading icon (since Bitmap class is not part of WPF).

Code follows same logic as one for Windows Forms. Only important difference is use of ImageSource as our final destination.

var hLibrary = NativeMethods.LoadLibrary(Assembly.GetEntryAssembly().Location);
if (hLibrary != IntPtr.Zero) {
    var hIcon = NativeMethods.LoadIcon(hLibrary, "#32512");
    if (hIcon != IntPtr.Zero) {
        return Imaging.CreateBitmapSourceFromHIcon(hIcon, Int32Rect.Empty, BitmapSizeOptions.FromEmptyOptions());
    }
}

Without further ado, here is full sample.

The Image Format Is Unrecognized

Illustration

As I started my new WPF application, I got greeted with FileFormatException - “The image format is unrecognized”. I was confused since application was so new that I haven’t added any images to it. After checking and double-checking I found which image exception was referring to - my application icon.

It seemed like normal icon to me. As I compared it to icons that I already used successfully with WPF there was only one difference. This icon had 256x256 size. As soon as I deleted it, my program started working again (ok, it was empty application so making it work was not that big of task).

Side effect of this solution was that I lost my big images. That felt dirty to me so I ended up with two icons in my application. First one was with all images (including 256x256) and I used it as application icon (Properties, Application, Icon). Second one was without 256x256 images and I just set it’s Build Action to “Resource”. Whenever I needed WPF window icon, I just pointed to second one.

I must confess that I am quite annoyed by this. WPF was all about making Windows look and feel better. Using brand new .NET 4 and restricting icons to sizes before Vista just does not seem right. And I better not start about how useful XAML exceptions are…

P.S. If you do not have icon editor available, I would recommend IcoFx. It is good and it is free.

Android Debug Bridge on HTC Desire

Illustration

Debugging Android programs on real device is easy. You just need to follow guide and everything will work. That is theory at least.

All instructions worked just fine up-to point where USB driver had to be installed. Dreadful “Driver not found” was all I was getting. Problem was obvious. My HTC Desire was just too new to be included in driver pack.

However, I had a hunch. “USB Driver for Windows, Revision 3” that was available to me was one that included support for Nexus One. Since Desire seems pretty close to it, I wanted system to use Nexus drivers anyhow.

First thing to do is right-click on My Computer, select Manage and go to Device Management. There you will see ADB device with yellow question mark. Right-click on that device and select properties. Under tab Details there is one combo box with properties. There we need to see “Hardware Ids”.

In case of HTC Desire hardware IDs in question were “USB\VID_0BB4&PID_0C87&REV_0100&MI_01” and “USB\VID_0BB4&PID_0C87&MI_01”. In “android_winusb.inf” file I just copied two entries for Google Nexus (“%SingleAdbInterface%” and “%CompositeAdbInterface%”) and replaced their hardware IDs with hardware IDs for Desire (with slight trimming). Changes are highlighted:

...
;Google NexusOne
%SingleAdbInterface%        = USB_Install, USB\VID_18D1&PID_0D02
%CompositeAdbInterface%     = USB_Install, USB\VID_18D1&PID_0D02&MI_01
%SingleAdbInterface%        = USB_Install, USB\VID_18D1&PID_4E11
%CompositeAdbInterface%     = USB_Install, USB\VID_18D1&PID_4E12&MI_01
;
;HTC Desire
%SingleAdbInterface%        = USB_Install, USB\VID_0BB4&PID_0C87
%CompositeAdbInterface%     = USB_Install, USB\VID_0BB4&PID_0C87&MI_01
[USB_Install]
...

And voilà, we have our driver ready.

P.S. While I talk about HTC Desire here, there is no reason why same method would not work for any other Android phone, providing that it is compatible (on USB communication level) with Nexus.

[2010-06-17: At least in case of Windows 7 and it’s “No driver found” error, it is enough to add only %CompositeAdbInterface%. I haven’t tested on other operating systems but I think that %SingleAdbInterface% is not used at all.]

Get Application's Icon

When I was building “About” dialog for my applications, I wanted it to be as reusable as possible. That meant that all data should be retrieved while program is running. Only thing that I could not discover within .NET code was application’s icon.

Windows API came to rescue. In short we just load our own assembly for purpose of extracting one icon resource. That gives us “good old” pointer which can be used to create bitmap.

IntPtr hLibrary = NativeMethods.LoadLibrary(Assembly.GetEntryAssembly().Location);
if (!hLibrary.Equals(IntPtr.Zero)) {
    IntPtr hIcon = NativeMethods.LoadIcon(hLibrary, "#32512");
    if (!hIcon.Equals(IntPtr.Zero)) {
        Bitmap bitmap = Icon.FromHandle(hIcon).ToBitmap();
        if (bitmap != null) { return bitmap; }
    }
}

Probably most curious thing is “#32512” string. This is resource identifier that goes way back into non-CLR past (also-known-as IDI_APPLICATION constant) and it is not only one that can be used.

Here is full sample.

Setting Android Environment

Illustration

Prerequisited

Before we start anything, we need two downloads:

Java SE Development Kit

This one is prerequisite for everything else. Just download it, run it and go wild on “Next”. Installation is as easy as it can be.

Installing Eclipse

Installing Eclipse is as easy as unpacking it. For purpose of this walk-through I will unpack it to root directory of drive D: (eclipse.exe will be located in directory D:\eclipse).

Installing Android SDK

Unpack archive to (D:\eclipse) and run “SDK setup.exe” (from “D:\eclipse\android-sdk-windows\SDK setup.exe”). Location is not set in stone but I like it in subdirectory of eclipse. If you desire some other location, just go for it.

As soon as you start it, it will attempt to download newest repository data. If you are behind proxy, this step will fail. In that case just go to “Settings” and fill proxy server and port fields. Often it is also necessary to check “Force https://… sources to be fetched using http://” for everything to download properly.

Once update is completed, you should get list of packages to install. I just leave it at default, check “Accept All”, and click on “Install”. Brace for lengthy download (around 800 MB for Android 2.2).

ADT Plugin for Eclipse

Once you start Eclipse go to “Help”, “Install new software”. Click “Add” once window opens. Now write “ADT Plugin for Eclipse” under site name (exact naming is not important) and “https://dl-ssl.google.com/android/eclipse/” under location. If your Internet access goes over proxy, you will need to use http location “http://dl.google.com/android/eclipse/”.

When packets are found (“Android DDMS” and “Android Development Tools”) I just select them both and click on “Next”/“I accept …”/“Finish” combo few times and download will start. After restart you need to go to “Window”, “Preferences”. There, under “Android” node, you need to select folder with unpacked Android SDK (in my case “D:\eclipse\android-sdk-windows”). All other things I left as default.

After one more restart (I am not really sure it is necessary) you will be able to create new project under “File”,“New”,“Project”:“Android\Android Project”.

Anything more

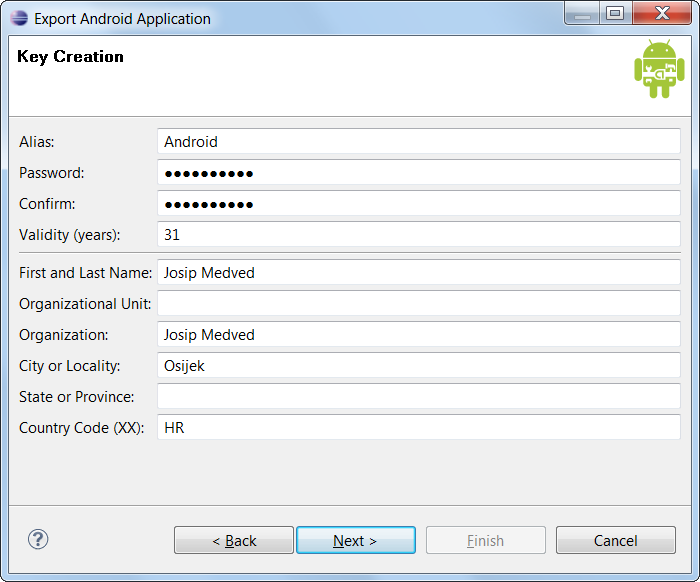
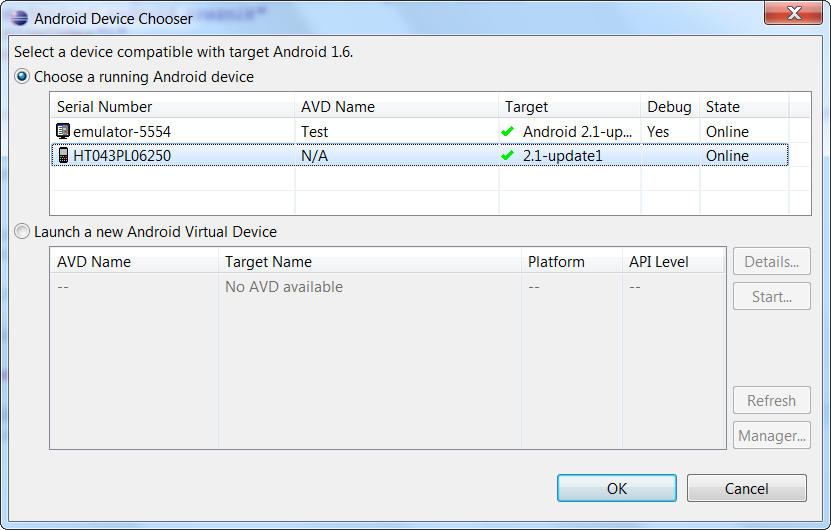
As you attempt to start project, you will get prompt to create emulator. If you would like audience as broad as possible, Android 1.6 is reasonable choice. If you want to target only newer devices, 2.1 is one that you should do your testing on. Those are only rule-of-thumb advices - do not take them too seriously.

If you intend to use command-line tools it would be good to add Android SDK tools to path (for me it is under “D:\eclipse\android-sdk-windows\tools”).

It is definitely not as easy as installing Windows Phone Developer Tools but it is not too bad.

Visual Basic 6.0 - Controls

I am preparing to clean my web site and I decided to remove all references to programming source samples. General idea is moving those samples to blog. Here I will start with my old VB 6 controls.

Download is here.

CmnDlg

Substitute for CommonDialog control.

Contain Containter for other controls.

Progress

Replacement for ProgressBar Common Control. Doesn’t use .ocx.

TextComplete

AutoComplete TextBox.

TrayIcon

Enables program icons in tray notification area.

P.S. Rest of old stuff can be found in this post.

Java Rfc2898DeriveBytes

I was creating Java port for one program of mine and I stumbled across little issue. Although C# and Java seem quite different, you can almost always rely on one-for-one feature compatibility. Of course I stumbled across one class that was not implemented in Java. That class was Rfc2898DeriveBytes (.NET PBKDF2 implementation).

To be totally correct, I did found quite a few classes that do implement RFC 2898 but they did not give same result as one I used in .NET. While those implementations were also correct ones, they did not ensure compatibility with my existing code.

.NET Reflector comes here as great debugging tool. Quick peek just discovered that core of .NET Rfc2898DeriveBytes class is HMAC SHA-1 algorithm. GetBytes method has some basic buffer management (data gets generated 20 bytes at time) and call to omnipotent Func method. It is in this method that real crypto-magic happens.

Fortunately, building blocks for this functionality is available to Java. Although syntax is somewhat different, general idea is same. Whole getBytes method needed only changes related to array copying. In .NET we would use Buffer.BlockCopy and in Java this translates perfectly to System.arraycopy. Really hard…

Crypto-core is hidden in function named “func”. Notable spot here is incrementing block counter. In C# this is unsigned int but in Java there is no such thing. That is reason for one extra check.

if (this._block == 2147483647) {
    this._block = -2147483648;
} else {
    this._block += 1;
}

With these few changes done our Java implementation of Rfc2898DeriveBytes was done. Source code can be downloaded here.

Requirements for Password Hashing

Illustration

Proper password hashing should satisfy few requirements.

First requirement is proper salting. I already wrote about this so check that post for explanation. I will just say here that properly implemented salting strengthens password against whole range of brute-force attacks. Storing password without salting is just not acceptable.

Second requirement would be using proven algorithm. Very often people (myself included) fall into trap of using easiest way there is. In case of password hashing this is usually just SHA-1 hash function. While this is definitely better than plain-text passwords, it is not ideal. Password hashing is just not that simple. Minimum would be support for RFC 2898 password derivation (both PBKDF1 and PBKDF2 will do). For this purpose .NET offers Rfc2898DeriveBytes class.

RFC 2898 also defines way to make your password hashing slow (via iteration count). Although every programmer wants code to run fast, exact opposite is required for password hashing. Idea behind it is to slow-down dictionary attacks. It is huge difference between trying out 10 and 1000000 passwords per second. Of course, you also need to think about users so some compromise is needed. There is no exact figure but I find anything sub-500 milliseconds acceptable to users.

Last requirement that I would add is using user name as part of hashing process. This is to protect us from “copy/paste” attacks if user names and hashes cannot be secured (e.g. in database table). If user name is not encoded, one could copy known password1 hash from user1 to user2 (overwriting password2 in progress). After that it will be possible to login as user2 with password1. That allows user1 to potentially create mess and blame everything on user2. If he restores old password2 afterward, you have security breach that is not easily traceable.

If you are not in mood for implementing this, you can download example of my implementation.

I opted for 9-byte salt and 20-byte key. That results in 30 bytes of output (first byte is iteration count). With base-64 encoding resulting string is exactly 40 bytes long.

8192 iterations should cause function to be around 500 milliseconds on most computers (@ 3GHz). This was selected as user’s psychological limit on waiting. Since number of iterations is stored in first byte of hash (12 for 4192 iterations, 13 for 8192, 14 for 16384 and so on) you can also speed-up (or slow-down) code by factors of two and retain compatibility among different versions.

User name string is converted to upper case before hashing (or checking). This causes user name to be case-insensitive even when encoded.

Passwords With a Grain of Salt

Illustration

90% of time that I see hashed password in database, it is result of MD-5, SHA-1 or similar hash algorithm. While this does satisfy bare minimum requirements for password storage it is not enough.

Problem lies in “rainbow table” attacks. While checking password against all possible combinations seems difficult, it becomes easier once you get one big file with all those combinations pre-computed. Cracking password becomes just searching for already existing hash. Yes, amount of data is quite big (hundreds of gigabytes) but any personal computer can handle this easily.

All you need is to download pre-existing rainbow table and check all entries against your hash. I checked this against some passwords I had access to and success rate was near to 100%. It was very scary experience. Fortunately, there is easy solution - just introduce salt.

Salt consists of few random bytes appended to password (8 bytes seems like nice number). Our hashing function then becomes:

hash = SHA1(password + salt)

This simple step invalidates all precomputed rainbow tables. Even better, since salt differs between users, each user must be attacked separately. Time for cracking just got increased significantly.

Cost on implementation side is just having another field for storing salt. Cost of few additional bytes per user seems reasonable.