Programming in C#, Java, and god knows what not

Adventures From SVG to XAML

Illustration

As huge fan of ribbon interface it was just a matter of time before I started playing with WPF flavored version. First thing that became obvious is that my standard toolbar bitmaps are not good anymore.

My default 16x16 icons looked slightly blurry on higher DPI settings when used in Windows Forms applications and I didn’t mind it much. Same icons in WPF looked just plain awful. I spent some time playing with various settings to get better results but even best settings could not hide fact that bitmaps were used. It was quite obvious that vector-based icons were what I needed.

There are some free XAML toolbar icons available but any meaningful project will have problems finding right (free) icon for the job. Since there is quite a selection of free SVG icons, thought came about converting one into another. How hard it can be to convert one vector drawing into another one.

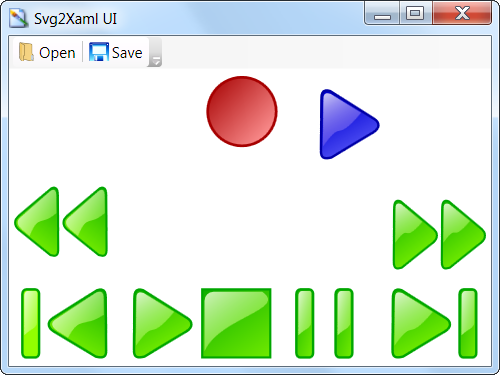
I decided to test this on various media buttons since that was exactly what I needed for one project.

First thoughts went toward InkScape. This is great vector drawing tool with option to save files as XAML. Resulting file used canvas for positioning various elements and thus it was not possible to use it as ribbon image. Simplest solution failed me.

Another solution was exporting file in PDF and then importing that into Expression Design and exporting it as XAML. It worked. However, results were less than satisfactory. All gradients were rendered as image instead of vector. Scaling picture didn’t quite feel right.

I spent better part of night and nothing quite worked.

Best results that I got were with Svg2Xaml library. It is LGPL project in very early phase (version 0.2) of development but I do not see any alternative library that is half as good.

Examples included with that library are quite good but I decided to create another one just for fun. As always, result of that tinkering is available for download.

Alternate Data Streams

NTFS has quite a few features that are hidden from everyday user. One of features that is difficult to access is alternate data streams.

Additionally to normal content, each file can have additional content attached to it. That content is, for all practical purposes, independent of original file content and it can contain anything. Most common stream is “Zone.Identifier”. It gets added by Internet Explorer (and some other browsers) to each executable to mark it as “unsafe”. Before such file gets executed you get security warning with notification that file arrived from big-bad-Internet.

Unfortunately this is as far as using this feature goes in Windows. Although one could think of thousands of more uses for it (e.g. adding thumbnails to file itself instead of separate file) its downfall is support on other file systems. Mere act of copying file to FAT partition will strip additional file streams. Mailing it is out of question and not even HTTP has any provisioning for it. With all that in mind, it is very unlikely that it gets used for anything more than temporary data.

If you are C# programmer and you have purpose for ADS, you will stumble upon another problem - it has no support in .NET framework. This is where this post gets useful.

I decided to implement support for alternate data streams in FileStream-like class that allows for same read/write functions to be used as in any Stream. It just wraps native CreateFile function into some FileStream contructor overloads. For deletion of particular stream within file we can use native DeleteFile and stream-specific functions (FindFirstStream and FindNextStream) will take care of enumeration.

I will let source code speak for itself.

Backing Field Must Be Fully Assigned

Structures are peculiar creatures in C#. One of more interesting peculiarities comes in combination with auto-implemented properties.

Lets begin with following struct:

public struct Test {
    public Test(int a) {
        this.A = 1;
    }

    public int A;
}

It is something that works, but having variable A directly exposed is not something that looks too good. Auto-implemented properties come to rescue:

public struct Test {
    public Test(int a) {
        this.A = 1;
    }

    public int A { get; set; }
}

This looks much better from design point of view. However, it also does not compile. It will greet us with: “Backing field for automatically implemented property ‘Test.A’ must be fully assigned before control is returned to the caller. Consider calling the default constructor from a constructor initializer.”

Solution is quite simple, just call default constructor (as suggested in error message) and everything is fine:

public struct Test {
    public Test(int a)
        this(): {
        this.A = 1;
    }

    public int A { get; set; }
}

Unfortunately, you gain something, you lose something. Our original structure stops us when we forget to initialize field and I think of this as great feature. It ensures that we cannot forget a field.

Solution with auto-implemented properties has no such assurance. Since we need to call default constructor at one point or another, we will end-up with all fields initialized by struct itself. There will be no further checks whether fields are set or not.

While code did get nicer, our refactoring just got harder.

2010 App Cannot Be Found in Local Install Folder

Illustration

Notice: there is quite some ranting going on here, skip to bottom for solution.

I am quite a big fan of Formula 1 racing and, of course, God of Irony decided that I am to be traveling at exact time of race. I was hoping to get some coverage on my mobile phone and I connected to live timing page only to find that my login from last year is not valid.

It figures that I would forget that you need to re-register for this EVERY year. And, of course, neither Internet Explorer or SkyFire would work. They used some strange ordering of elements and submit button was just not visible. After initial frustration, I did find a solution. There is mobile version of site. There I was finally able to register.

I went to download mobile application that would give me access to all race data. My phone was listed among supported and I downloaded application, started install - only to be greeted with “2010 App cannot be found in local install folder”.

Shit, I thought, Internet Explorer is playing games again, I will try SkyFire - same result. In moment of desperation I even installed Opera Mobile only to have same issue. Notice that I was now almost an hour into race and with no data other that first three drivers. I was quite nervous.

In faq they mentioned using JavaFX for running application. In moment of desperation I downloaded it and, what would you know, application started.

There was some initial confusion with entering data because some idiot decided that my mobile must be limited to T9 entry. That meant that, even as phone had physical QWERTY keyboard, I needed to use my keypad to login. As Murphy would have it, after all that trouble, application was unable to connect to my 3G Internet. I fiddled with quite a few settings and gave up…

This morning I checked what exactly was happening and I noticed problem. My install file (Formula1.jad) was only 397 bytes in length. My default Java engine (Esmertec Jbed) didn’t know how to get rest of data. No direct link was present in jad but I figured that jar cannot be too far. Using my laptop, I downloaded jar from same location where jad was. It was enough to copy link and change extension.

I uninstalled JavaFX since I had no use of Java engine without Internet access and proceeded to install Formula 1 application with both jad and jar in same folder. This time it went without hitch.

Named Pipes in WCF

One of new things in .NET 3.5 was support for pipes (both named and anonymous). Since in some of my applications I used P/Interop for that exact purpose, it seemed quite logical to upgrade that code into native solution. As I started changing code I also started to hate that implementation.

Although new classes are quite easy to use, troubles start as soon as you start transferring little bigger amounts of data (more that cca 200 bytes). I spent better part of night troubleshooting problems with messages broken into multiple parts although buffer sizes were more than adequate and Message transmission was used.

Everything was worsened by design decision to kill off two things that make life easier when playing with those streams. First thing that I needed was ability to check whether there is more data before I start to read it (PeekNamedPipe). This comes in quite handy to dimension your buffers and generally detect when data stream is dry. I needed this function quite a lot because they also decided to kill timeouts for Read() function. Once you start reading data, there is no stopping. And since there is no way to know whether there is more data awaiting other than actually reading it I had quite a big problem at my hand.

I was on verge or restoring old P/Inteop code when I had revelation. Old project was based on .NET 2.0 and with this upgrade I will move it to 3.5 anyhow - why wouldn’t I use Windows Communication Foundation. I played with it before with great success but here I wanted to see how simple it can be and main goal was just to integrate it in already existing flow.

Old application used notion of sending actions to other party and just giving responses to user and that simplified what I needed to do drastically.

Main thing to do is specifying how your communication interface will look like:

[ServiceContract(Namespace = "http://example.com/Command")]
interface ICommandService {

    [OperationContract]
    string SendCommand(string action, string data);

}

This code I needed in both server and client part of my code. Beautiful thing is that it is quite enough to have this file in both places and there is no need for separate assembly to hold common definitions.

Only thing left to be done in client was creating proxy to actually call that method. I opted for separate class, but I could be as easy written in any other existing class:

class CommandClient {

    private static readonly Uri ServiceUri = new Uri("net.pipe://localhost/Pipe");
    private static readonly string PipeName = "Command";
    private static readonly EndpointAddress ServiceAddress = new EndpointAddress(string.Format(CultureInfo.InvariantCulture, "{0}/{1}", ServiceUri.OriginalString, PipeName));
    private static readonly ICommandService ServiceProxy = ChannelFactory<ICommandService>.CreateChannel(new NetNamedPipeBinding(), ServiceAddress);

    public static string Send(string action, string data) {
        return ServiceProxy.SendCommand(action, data);
    }
}

Server part was little bit more complicated but not significantly so:

[ServiceBehavior(InstanceContextMode = InstanceContextMode.Single)]
class CommandService : ICommandService {
    public string SendCommand(string action, string data) {
        //handling incoming requests
    }
}
static class CommandServer {

    private static readonly Uri ServiceUri = new Uri("net.pipe://localhost/Pipe");
    private static readonly string PipeName = "Command";

    private static CommandService _service = new CommandService();
    private static ServiceHost _host = null;

    public static void Start() {
        _host = new ServiceHost(_service, ServiceUri);
        _host.AddServiceEndpoint(typeof(ICommandService), new NetNamedPipeBinding(), PipeName);
        _host.Open();
    }

    public static void Stop() {
        if ((_host != null) && (_host.State != CommunicationState.Closed)) {
            _host.Close();
            _host = null;
        }
    }
}

Once server application starts just call CommandServer.Start() and all requests from client side will be auto-magically instantiated in CommandService. Whatever you decide to return from that method arrives directly to client. It cannot be simpler than that.

I created small example but do notice that it is a console application and no multi-threading issues are being addressed here. Since WCF is working on separate thread any conversion into Windows application will most probably require playing with delegates and that is subject for some other story.

P.S. Do not forget to add reference to System.ServiceModel assembly.

POSIX Time

If you are working with Unix a lot, you get to be aware of weird time-stamps. That markup is usually called Unix time (although POSIX time is more precise term) and it represents number of seconds from January 1st 1970 (in UTC).

I was handling some timing issues in log and I needed to convert between local and Unix time. Since I got quite annoyed during day, at night I created small utility to handle this simple task.

Both application and full code is available.

Toolstrip and Case of Extra Line

Illustration

I needed up/down buttons for one program of mine and I decided to have them on ToolStrip control.

As soon as I figured how to make it vertical, I stumbled upon shade issues. In default RenderMode (ManagerRenderMode) background is just little bit of different background color. Usually this does not matter since ToolStrip is docked on form but in this situation it was quite visible. Solution was simple - switch RenderMode to System and control blends in perfectly.

However, using System render mode has one downfall. There is small light 3D line on bottom of control. Although it is not visible too much, it was enough to bother me.

Since System rendering is done via ToolStripSystemRenderer class, first idea was to extend it. And there it was - OnRenderToolStripBorder. It is enough to override this method and border is never created:

class ToolStripBorderlessSystemRenderer : ToolStripSystemRenderer {

    protected override void OnRenderToolStripBorder(ToolStripRenderEventArgs e) {
        //base.OnRenderToolStripBorder(e);
    }

}
[/sourcecode]


Only thing left is to actually telling ToolStrip to use our class for rendering:
```csharp
SettingsForm() {
    InitializeComponent();
    toolstripVhdOrder.Renderer = new ToolStripBorderlessSystemRenderer();
}

Order of Activation

In one of my programs I fixed a bug. I just forgot to restore TopMost state of form. Fix was very simple, just set this.TopMost = true in form’s constructor and everything is solved.

Like every simple fix, this one failed miserably. As soon as I “fixed it” I could not even start program. Even worse thing is that it failed where there was no error before. It didn’t take much to deduce that this change was somehow responsible for triggering error in completely different part of code. It looked like just fact that I have TopMost turned on changes how rest of program is loaded.

I tested program without setting TopMost and order of triggering form’s events was quite expected - first constructor, then Form_Load, then Form_Activated and Form_Shown. However, things do change when you set TopMost property.

It is a subtle change - contructor is still first one to complete, next one is Form_Activated, then Form_Load and Form_Shown is last once more.

If you have code in both Form_Load and Form_Activated you have a minefield in your code. Everything works as expected until you step on mine. In my case mine was TopMost property, but it is not only one that behaves like this.

Solution was dead simple - just move TopMost from constructor to Form_Load and everything works perfectly.

Sample for your testing can be found here.

Case for SysUInt

I was cleaning up one of my old programs and I got interesting warnings from code analysis:

CA1901 : Microsoft.Portability : As it is declared in your code, the return type of P/Invoke 'RichTextBoxEx.NativeMethods.SendMessage(IntPtr, Integer, Integer, Integer)' will be 4 bytes wide on 64-bit platforms. This is not correct, as the actual native declaration of this API indicates it should be 8 bytes wide on 64-bit platforms. Consult the MSDN Platform SDK documentation for help determining what data type should be used instead of 'Integer'.
CA1901 : Microsoft.Portability : As it is declared in your code, parameter 'wParam' of P/Invoke 'RichTextBoxEx.NativeMethods.SendMessage(IntPtr, Integer, Integer, Integer)' will be 4 bytes wide on 64-bit platforms. This is not correct, as the actual native declaration of this API indicates it should be 8 bytes wide on 64-bit platforms. Consult the MSDN Platform SDK documentation for help determining what data type should be used instead of 'Integer'.

I checked other code where I used that function and I noticed that I used IntPtr there. However, although this was technically correct, it didn’t sound right. SendMessage has many purposes and here I was using it to set tab stops. While I could wrap number in IntPtr and pass it like that, I wanted another solution. Solution that will allow me to use number and still have IntPtr-like behavior.

Of course, as usual in .Net P/Interop, solution seemed quite simple. Use whatever data type you wish and just set correct marshaling. I used signature that P/Invoke Interop Assistant generated:

Of course, as usual in .Net P/Interop, solution seemed quite simple. Use whatever data type you wish and just set correct marshaling. I used signature that P/Invoke Interop Assistant generated:

<DllImport("user32.dll", EntryPoint:="SendMessageW")> _
Public Shared Function SendMessageW(<InAttribute()> ByVal hWnd As IntPtr, ByVal Msg As UInteger, <MarshalAs(UnmanagedType.SysUInt)> ByVal wParam As UInteger, <MarshalAs(UnmanagedType.SysInt)> ByVal lParam As Integer) As <MarshalAs(UnmanagedType.SysInt)> Integer
End Function

On next run program greeted me with “Cannot marshal ‘parameter #3’: Invalid managed/unmanaged type combination (Int32/UInt32 must be paired with I4, U4, or Error).”. No matter what I did, it would not budge. It seems that this tool disappointed me once again.

To keep long story short, this is final function I decided to use:

<DllImport("user32.dll", EntryPoint:="SendMessageW", CharSet:=CharSet.Unicode)> _
Friend Shared Function SendMessageW(ByVal hwnd As IntPtr, ByVal Msg As UInteger, ByVal wParam As IntPtr, ByRef lParam As IntPtr) As IntPtr
End Function

Since my code still needed to pass integers I made wrapper to sort that out:

Public Shared Function SendMessage(ByVal hWnd As IntPtr, ByVal Msg As UInteger, ByVal wParam As Integer, ByVal lParam As Integer) As IntPtr
    Return SendMessageW(hWnd, Msg, New IntPtr(wParam), New IntPtr(lParam))
End Function

With that my work was done.

P.S. Yes, you are not mistaken, code is in VB.NET. It is program I wrote a while back and I have no intention to rewrite it in C# just to get single bug fixed.

P.P.S. I find it interesting that LRESULT is really IntPtr although name does not suggest so (at least not to me). HRESULT on other hand is not IntPtr although from name I would deduce it is handle (and thus IntPtr).

InternalsVisibleTo

InternalsVisibleTo is interesting attribute. It will make all it’s internal (or friend) fields open to the special one. In this case “special one” is another assembly.

Let’s try to elaborate this with example. Assembly A.exe has reference to B.dll. A.exe can see all public fields and nothing more. However, if designer of B.dll adds InternalsVisibleTo attribute, A.exe will be able to see his fields marked with internal also.

One can argue that this violates “black box” principle and I would agree. This attribute is not to be used regularly. I can think only two reasons why you should use this.

First one is component test. If you “befriend” your test assembly (A.exe) and B.dll this means that testing of target assembly is not limited to public interface. You suddenly have power to test internal workings.

Another usage is for those solutions that have multiple projects in different language. Sometimes you just have components already available in one language (e.g. C#) while main project is in another (e.g. VB.NET). Instead of rewriting everything, simple make new assembly and have all it’s content internal with InternalsVisibleTo exception for main project.

For this case benefits are doubtful since you might as well make those classes public and everything will work as it should. However, I like to make it internal in order to prevent others accessing it. If you just leave public assemblies laying around chances are that someone will use it.

That may be new guy on project that doesn’t know history of that class and he will just see opportunity to hook into already existing interface. He will not know that this was not intended to be public interface and that it wasn’t tested as such and probability is high that something will break.

While public assemblies hopefully get interface testing that they deserve, original idea of this assembly was to be glue between languages. It may be that everything works great while it has benefit of all calls being made from main project but, once you directly access it, you will stumble on quite a lot of problems and border case error that weren’t issue before. And if you ship it, you get to support public interface that was never designed as such.

If you still want to use this attribute after all this warnings, just add it in AssemblyInfo.cs (or your own favorite place):

[assembly: InternalsVisibleTo("A, PublicKey=00240000048000009400000006020000002400005253413100040000010001002de64bdf2fb7ba60913800e843fe50288f7c1467051bb0a70eca140d1e3900530a51931ead28a80d50c7b4bd7a6ec868f601dee366fef644d129a43d6eb8090c1fd097d4e13b80b1069eafab518233e0f21e14e89ee73e47486a7faf4ea2a4ad5dd48a80d1477fdd3c1715c8b46e876bbc2c27595914a0c1437d44e656e4c2d3")]

As you can see, attribute will take one argument consisting of two parts separated by comma (,). First is name of your project (in this case “A”) and other is public key of that strong-signed assembly (yes, this attribute will not work on assemblies that are not strong-signed).

In order to get that last piece of puzzle, one can use Microsoft’s Strong Name utility:

sn -Tp .\A.exe

Microsoft (R) .NET Framework Strong Name Utility  Version 3.5.30729.1
Copyright (c) Microsoft Corporation.  All rights reserved.

Public key is
00240000048000009400000006020000002400005253413100040000010001002de64bdf2fb7ba
60913800e843fe50288f7c1467051bb0a70eca140d1e3900530a51931ead28a80d50c7b4bd7a6e
c868f601dee366fef644d129a43d6eb8090c1fd097d4e13b80b1069eafab518233e0f21e14e89e
e73e47486a7faf4ea2a4ad5dd48a80d1477fdd3c1715c8b46e876bbc2c27595914a0c1437d44e6
56e4c2d3

Public key token is b80ce85f4244428f

Of course, to do this you will need to have “C:\Program Files\Microsoft SDKs\Windows\v6.0A\Bin” (or whichever directory holds sn.exe on your system) in path.